KeylinkIT

What are Auto-Replies?

Explore the efficiency of utilizing Outlook Auto Reply and Auto Response features for your Outlook M365 account! Whether you’re off on vacation, engaged in an event, or require uninterrupted focus, leveraging automatic replies enables you to keep colleagues and contacts well-informed about your unavailability. Our Visual User Guide offers a step-by-step walkthrough for both the Desktop App and Web Access, streamlining the process of configuring and personalizing auto-responses for both internal and external correspondents. Stay seamlessly connected while retaining control over your communication with our comprehensive resource on Outlook Auto Reply and Auto Response functionalities for Outlook M365!

How to Turn On Auto-Responses for Outlook Desktop App

1. Select File in the top left-hand corner.
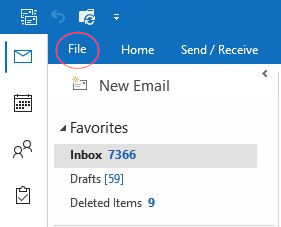
Outlook Auto Response Step 1_ Outlook Auto Reply
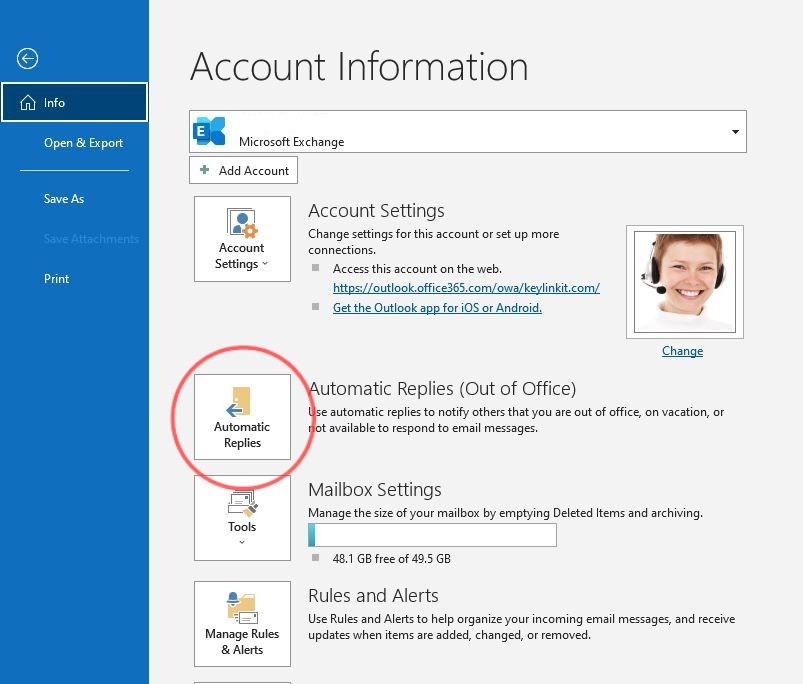
  1. Select Automatic Replies.
Guide Step 2

3. Select the dates and times you’d like to set your automatic reply for.

3.1. Select Send automatic replies.

3.2. If you would like to set a date range for the automatic replies, select Only send during this time range. This will automatically start and end your auto-replies during a designated window.

3.3 Enter the dates and times for the start/end time.

*Please be aware that steps 3.2-3.3 are optional. Users have the flexibility to set automatic replies without specifying an end date. In such cases, the user will need to manually turn off the automatic replies when they become available again.*
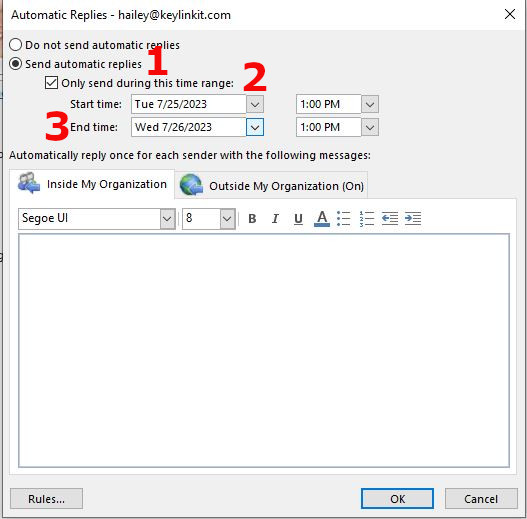
Outlook Auto Reply Step 3

4. Type in a message for Inside My Organization. You can format the text using the toolbar, or cut and paste text you’ve formatted, including hyperlinked text. You may also create a message for people outside your organization by selecting the Outside My Organization tab.

5. Select OK.
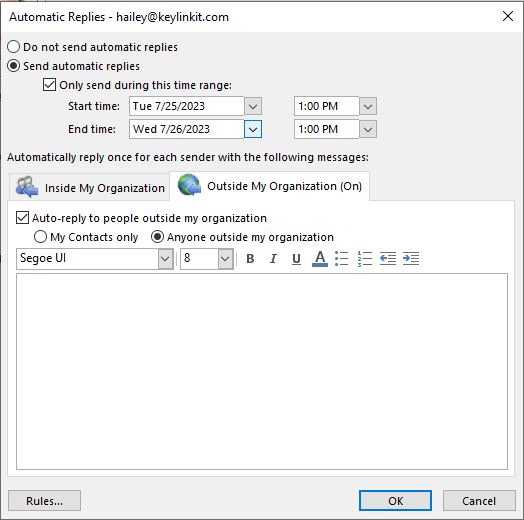
Outlook Auto Reply Step 4-5

How to Turn On Auto-Responses for Outlook Web Access (OWA)

  1. Click on the cogwheel icon (Settings) in the Mail view’s top-right corner. Then, select View all Outlook settings.
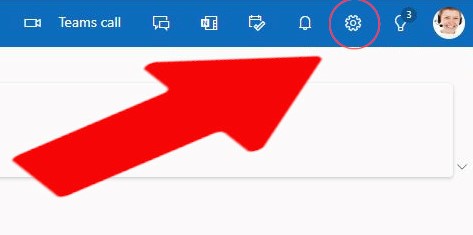
 

Outlook Auto Reply

2. Once you open the Settings window, choose Mail and then select Automatic replies.
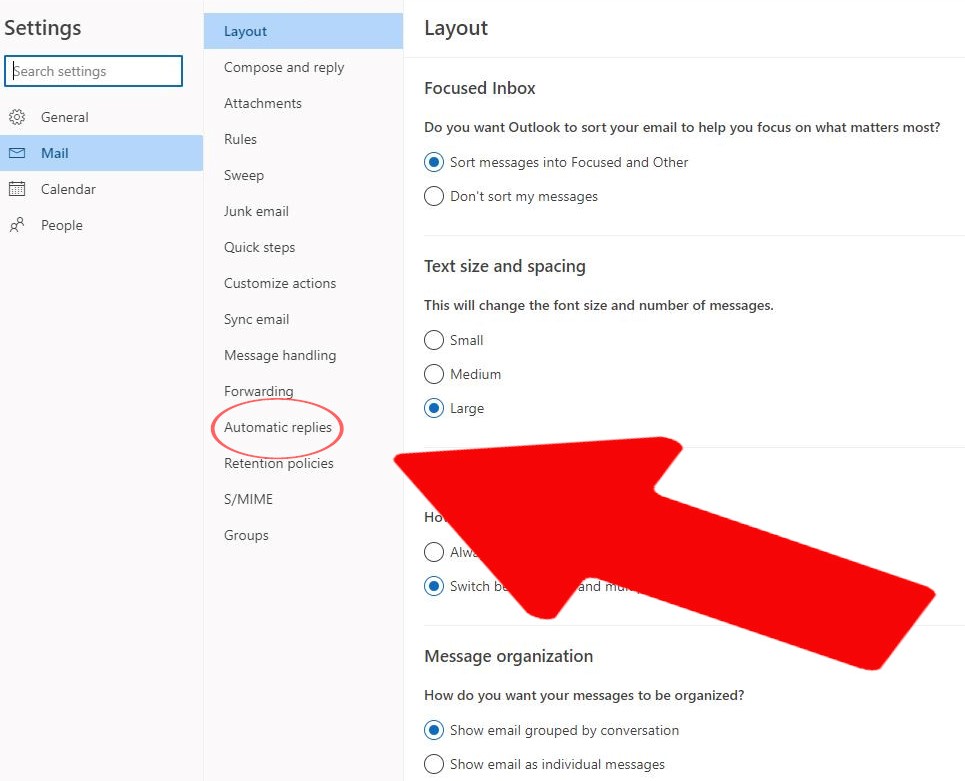
 

Outlook Web Access Auto Reply Visual Guide Step 2

3. To enable automatic replies, simply click on the toggle next to Turn on automatic replies.
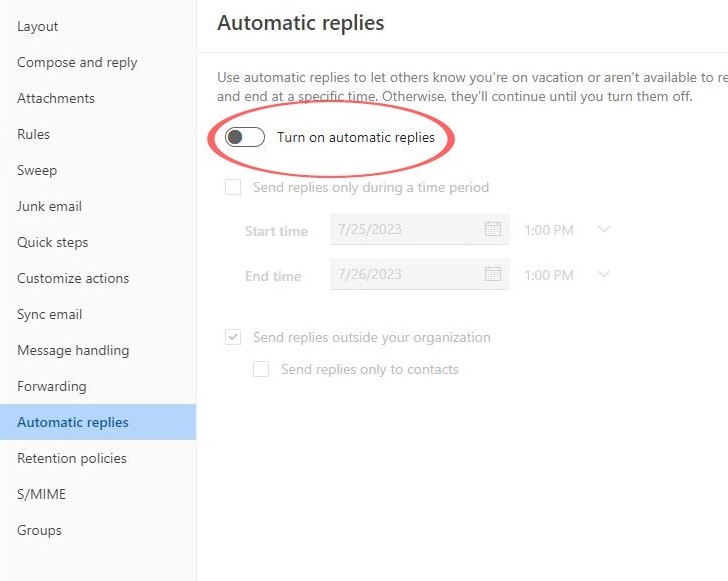
 

Outlook Auto Reply

4. To enable automatic replies, simply click on the toggle next to Turn on automatic replies.

 4.1. Check the checkbox next to Send replies only during this time period. Then, choose the desired start and end date/time for the automatic replies.

4.2. In the box provided under Send automatic replies inside my organization, type the auto-response message that you would like to be sent.

4.3. If you wish to send an auto-response to external senders, check the checkbox labeled Send replies outside your organization. Then, enter the desired text within the provided box for the auto-response message.

4.4. Select Save.
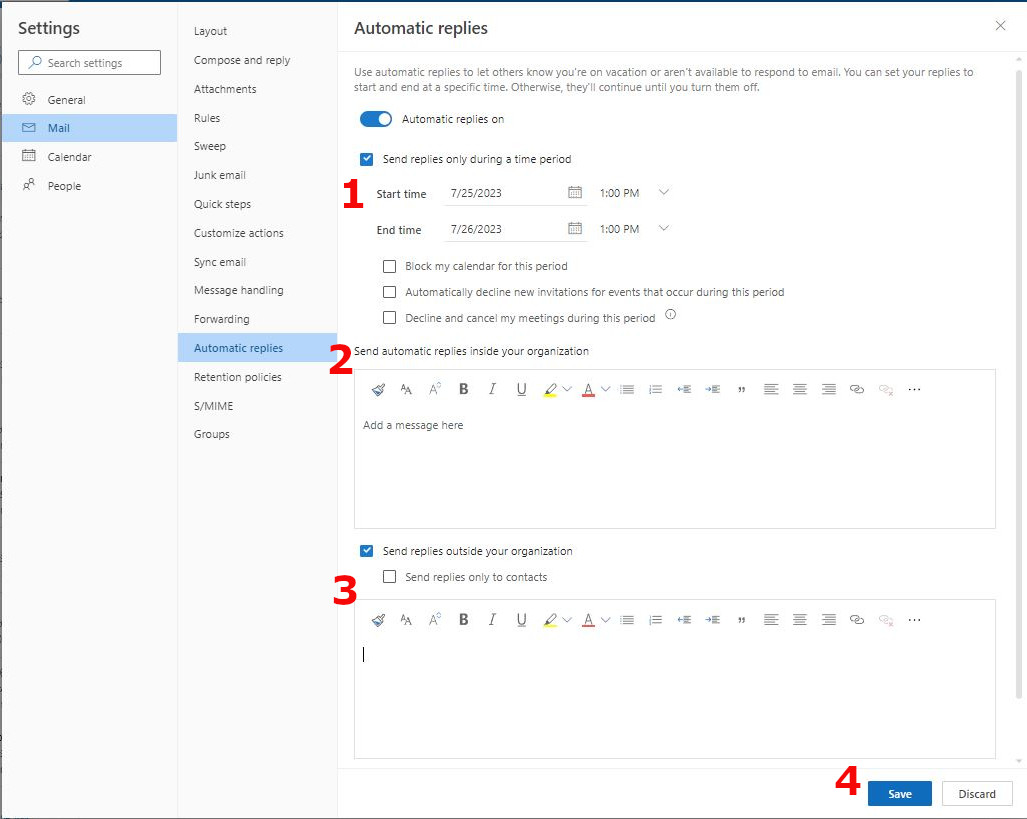
Outlook Web Access Auto Response Visual Guide Step 4

3CX User Guide Videos

Getting Started with Your New 3CX Account 3CX Mobile App - How to Install and Configure How to Perform in Call Functions with 3CXGetting Started with Your New 3CX Account3CX Mobile Application Installation & Setup Guide3CX - How to Perform In Call Functions

How to Use Yealink T29G Phone

Directory Yealink T29G Phones User Guide Understanding the Yealink T29G Phone Light Colors T29G - How to Perform Actions During a CallKeylinkIT Yealink Phones User GuideExplore the Visual User Guide for Yealink T46U and T29G phones – your comprehensive resource for...

3CX Android App Installation & User Guide

Directory Keylink IT SnapGuideInstalling the iOS App Setting Up Your ExtensionMaking Calls Blind Transfer Attended Transfer Conference Record Video New Call Mute Yourself Hold CallKeylinkIT 3CX Android AppThe 3CX Android App Installation and Configuration guide offers...

3CX iOS (iPhone) App Installation & User Guide

Directory Keylink IT SnapGuideInstalling the iOS App Setting Up Your ExtensionMaking Calls Blind Transfer Attended Transfer Conference Record Video New Call Mute Yourself Hold CallKeylinkIT 3CX iOS AppThe 3CX iOS App guide offers an easy way to handle office...

WordPress: Divi Page Editor Guide

KeylinkIT How to use the Divi Page BuilderIn today's dynamic digital era, building beautiful and functional websites has never been more essential. With Divi Page Builder, the power to create, innovate, and inspire is right at your fingertips. Whether you're a...

Synology VPN User Guide

Directory Keylink IT SnapGuide Keylink IT Visual Manual Download the SnapGuide Here!KeylinkIT How to Use Synology VPN Welcome to our visual User Guide for Synology VPN – your comprehensive companion to effortless setup and usage. Synology VPN offers a secure VPN...

How to Use Yealink Handset Phones

Directory Yealink T46U Phones Yealink T46U Phones User Guide T46U - How to Perform Actions During a Call Yealink T29G Phones Yealink T29G Phones User Guide Understanding the Yealink T29G Phone Light Colors T29G - How to Perform Actions During a CallKeylinkIT Yealink...

How to Use SharePoint on Desktop

DirectoryHow to Sync SharePoint Libraries to Your ComputerKeylinkIT SharePoint and File Syncing: A Quick OverviewSharePoint, developed by Microsoft, revolutionizes how companies manage documents, collaborate, and communicate. Its standout feature, seamless file...

How to Download the Microsoft Teams App

DirectoryHow to Install Microsoft Teams on Desktop How to Install Microsoft Teams App on iPhone or iPad How to Install Microsoft Teams App on Android Phone or Tablet How to Sign Into the Microsoft Teams App on Mobile Devices and TabletsKeylinkIT How to Install...

How to Manage Junk and Phishing Emails in Outlook

Directory:How to Label Both the Email and its Sender as "Not Junk" in Outlook How to Report Emails as Phishing How to Block EmailsKeylinkIT How to Manage Junk, Spam, and Phishing EmailsDealing with important emails ending up in the junk folder within Outlook can be...