

Directory
How to Install and Configure app
Using the App
KeylinkIT
How to Use the 3CX PWA
Welcome to the 3CX Progressive Web App (PWA) — a powerful, browser-based phone system that gives you full access to your business communication tools without needing to install traditional software.
This guide will walk you through everything you need to know to get up and running with 3CX, including:
Installing the PWA and Chrome Extension
How to Make Calls
Managing Your Status and Office Hours
Setting up Voicemail Greetings
Transfering Calls and Using In-Call Features
Using Chat and Checking Call History
How to Install the 3CX PWA
1. Log into the Web Client
-
Check your email for one with the subject: “Your User Account on your New 3CX System.”
-
This email includes your:
-
Web Client Link
-
Extension number
-
PIN
-
-
Click the Web Client link in the email and log in using your extension and PIN.

2. Install the PWA
-
Once logged into the Web Client, look to the bottom-left corner of the screen.
-
Click “Apps.”
-
In the pop-up, choose “Install PWA.”
-
Your browser will prompt you to install the app. Click “Install” or “Add to Desktop/Home Screen” depending on your browser.
- In the Apps Window, choose “Install PWA.”
-
Your browser will prompt you to install the app. Click “Install” or “Add to Desktop/Home Screen” depending on your browser.

3. (Optional but Recommended) Install the Chrome Browser Extension
The 3CX Chrome Extension is more than just a shortcut — it’s a powerful tool that supercharges your calling experience right from your browser.
Click-to-Call from Any Website
Instantly click phone numbers on websites (like CRMs, directories, or email signatures) to place calls through 3CX — no copy-pasting needed.
Popup Notifications
Get incoming call alerts and answer directly from your browser — even if the PWA isn’t open.
Quick Access to the Web Client
Get incoming call alerts and answer directly from your browser — even if the PWA isn’t open.
Seamless Integration
Works perfectly with the PWA and your 3CX phone system — everything stays synced.
-
While in the Web Client, go back to the “Apps” section in the bottom-left corner.
-
Select the option for “Chrome Extension.”
-
This will open a new tab in your browser and take you to the Chrome Web Store.
-
Click “Add to Chrome” and confirm by clicking “Add Extension.”
-
Once installed, the 3CX icon will appear in your browser toolbar.

- Click “Add to Chrome”.

-
Confirm by clicking “Add Extension.”
-
Once installed, the 3CX icon will appear in your browser toolbar.

Using the 3CX PWA
Set Your Status
Your status in 3CX isn’t just a label — it directly controls how your calls are handled, when you receive notifications, and whether your colleagues can see you as available. Setting your status correctly helps you stay productive and ensures that incoming calls are managed the way you want.
Available
-
You’re ready to take calls
-
Everything rings through
-
Notifications are on
Away
-
Stepping away temporarily
-
Calls may forward to voicemail or another number
Do Not Disturb (DND)
-
No interruptions.
-
Calls go straight to voicemail
-
Notifications are silenced.
Lunch
-
On break.
-
Calls are usually routed like “Away,” but can have separate settings.
Custom
-
Create a personalized status with your own rules and routing.
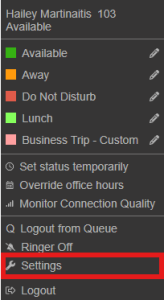
- Click your profile icon (top-right corner)

- Choose from:
-
-
Available
-
Away
-
Do Not Disturb
- Lunch
-
Custom
-
-
Setting the correct status helps coworkers know when you’re reachable.

How to Make a Call
-
Click the phone icon in the top-right corner of the 3CX PWA. This opens the dial pad.
- Use the dial pad to enter an extension or external phone number.
-
Click the green phone icon to place the call.
💡 You can also search for a coworker’s name or extension in the Contacts tab and click their number to call directly.

How to Set Up Voicemail
- Click on your Profile Icon in the top right corner
2. Select Settings
3. Click on Greetings in the settings menu
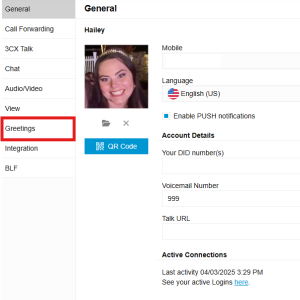
4. You are now on the Voice Greeting Page

Upload Greeting
-
Click this button if you wish to upload a pre-recorded greeting
-
To convert unsupported files, click here
Delete Greeting
-
Deletes existing greeting message
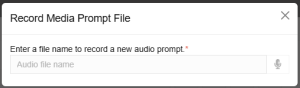
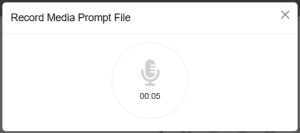
Record Greeting
-
Allows you to record the voice message directly from your computer/laptop
Record Greeting via Call
-
Allows you to record the voice message via a phone call to an extension
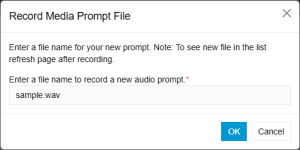
How to Record a Greeting from your Computer/Laptop
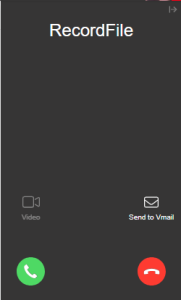
How to Record a Greeting from a Call

How to Set Office Hours
The Schedule page in the 3CX PWA lets you define your personal office hours and break times, allowing the system to automatically manage your availability and call behavior based on your work schedule.
1. From Settings, select Call Forwarding

2. Select Schedule

3. You are now on the schedule page

🔧 Working Hours Options
At the top, you’ll see two choices:
-
This extension uses default office hours
Your hours will follow the system-wide defaults set by your administrator. -
This extension uses specific office hours
Select this if you want to set custom hours just for your extension.
🕗 Office Hours Section
Set the times you’re typically available to receive calls each day.
-
Click on the blue time range (e.g., 8:00 AM – 5:00 PM) next to a day to adjust the hours.
-
Click Add to add a second time range (e.g., split shifts or after-lunch hours).
-
Use Clear to remove hours entirely for a specific day.
☕ Break Hours Section
This lets you mark times during the day when you’re on break and don’t want to receive calls (like lunch).
-
Click Add next to any day to define a break period (e.g., 12:00 PM – 1:00 PM).
-
Use Clear to remove all break hours for that day.
🔄 Automation Options
At the bottom, there are two powerful automation settings:
-
Automatically switch status to Available during office hours
When enabled, your 3CX status will automatically change to Available at the start of your working hours and back to Away or DND when they end. -
Disable Outbound calls outside office hours
When checked, you won’t be able to make outgoing calls before or after your scheduled working hours.
How to Transfer Calls
Blind Transfer
Directly pass the call to another party without speaking to them first.
How to Blind Transfer:
To perform a blind transfer, click on Transfer and enter the name or number of the intended recipient. The call is transferred directly without your involvement.
Attended Transfer
Talk to the intended recipient before transferring the call.
How to Attended Transfer:
For an attended transfer (speaking to the recipient before transferring), click Att.transfer. This allows you to put the caller on hold, speak with the recipient, and then pass the call throughby clicking Join.
How to Perform Other In-Call Functions
Conference
Bring more people into the call
How to Conference:
Simply click the Conference button and input the name or number of the participants you wish to add to the call. They will be dialed, and upon answering, they will join the ongoing call.

Record
Capture the conversation for future reference
How to Record:
At any point during a call, you have the option to record the conversation. Click Record to start (it will be blue when recording) and click again to end the recording. You can access the recorded calls in the Web Client under Recordings (if you have the necessary permissions).

Video
Elevate your call to a video format
How to Elevate Call to a Video Call:
To elevate the call to a video call, click the Video icon in the dial pad. This action allows you to switch to a video call without ending the current call.

New Call
Put the ongoing call on hold to initiate another call
Initiating a New Call:
You can start a new call on a separate line without disconnecting the current call. Click New Call and enter the name or number of the callee.

Mute Yourself
Silence your end of the call to prevent the caller from hearing you
Muting Yourself:
To mute youself during a phone call, simply click the Mute button. To unmute, click the Mute button again.

Hold Call
Putting a call on hold is like muting it, except the person on the other end hears hold music.
Placing a Call on Hold:
To place the call on hold, select the Hold button and the call will go on hold and the caller will hear a hold tone being played. To resume the call, click the Hold button again.
