KeylinkIT
How to use the Divi Page Builder
In today’s dynamic digital era, building beautiful and functional websites has never been more essential. With Divi Page Builder, the power to create, innovate, and inspire is right at your fingertips. Whether you’re a seasoned developer or a novice dipping your toes into the world of web design, this guide promises to be your indispensable companion.
Our team at KeylinkIT has poured hours into making this comprehensive resource for you, ensuring that every aspect of Divi is covered, clarified, and made compelling. Our mission? To simplify the complex and help you unlock the full potential of your web design projects.
As you journey through this guide, you’ll discover tricks, tips, and techniques that will transform your web-building experience. Dive in and let the magic of Divi unfold.
How to select a page to edit?
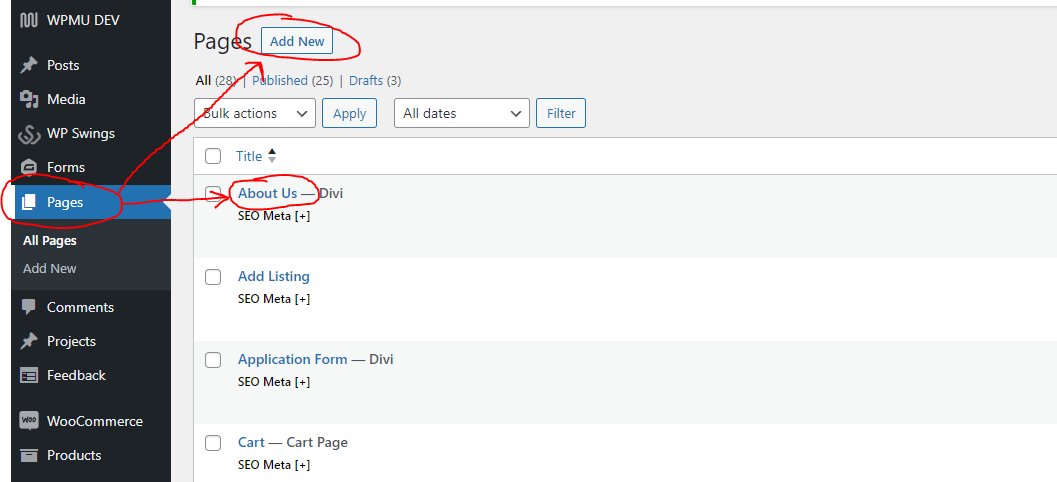
1. Login to your wordpress website’s administrator backend.
2. Click on the “Pages” link on the left side admin menu.
3. Select a page from the list by clicking the name of the page. You may also click the “Add New” Button.
How to open the Divi Visual Builder?
1. Open the edit page screen. (see previous section)
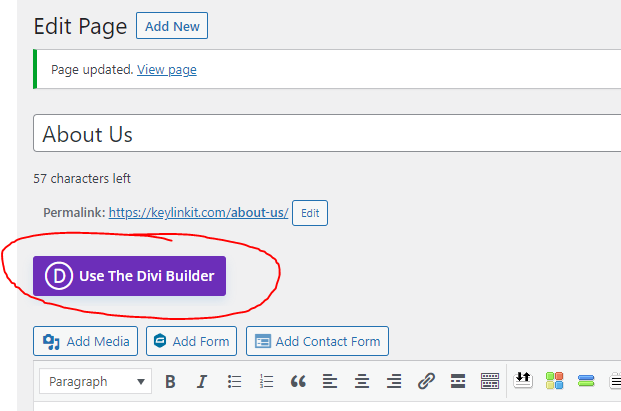
2. Click the “Use Divi Builder” button to activate the divi builder on this page.
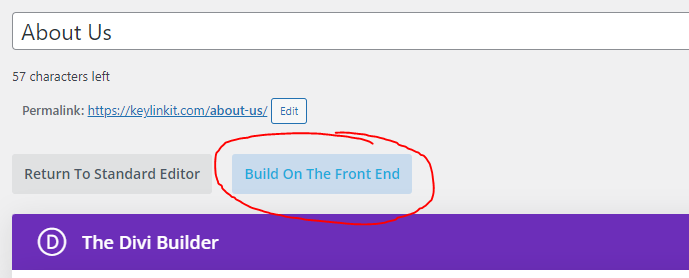
3. Click the “Build on front end” button near the top of the edit screen. If you do not see this button, ensure you have either the “Divi” Theme or “Divi Builder” Plugin.
What are sections, columns and elements?
What is a section?
In the Divi Builder, a section is like a container for your content. It’s a space where you put rows, columns, and other elements. These sections stretch across the whole screen width and help you organize and design parts of your webpage. With Divi, it’s easy to add or change sections to make your site look great.
How do I create a section?
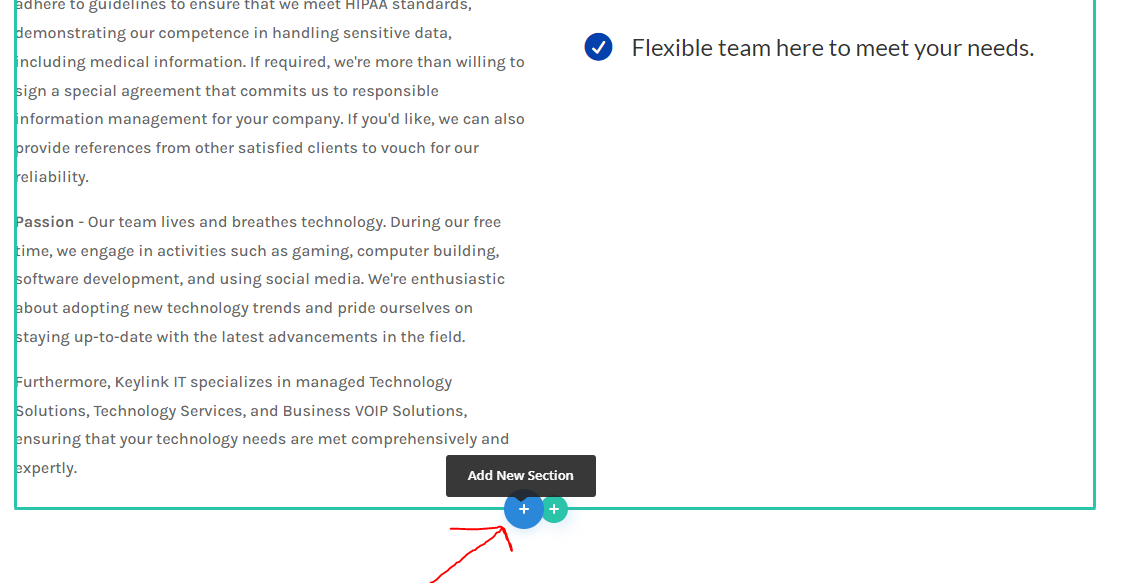
1. To create a section, click on the blue plus button on the page you are editing. Typically, you will find the blue plus button below other sections or at the top of the page if the page is blank. See screenshot to have a visual for the blue plus button.
What is a column?
In the Divi Builder, a column is a space within a row where you place your content. Rows can be divided into multiple columns, allowing you to organize and design side-by-side elements on your webpage. With Divi, adjusting the number and size of these columns is straightforward, helping you shape the layout you want.
How do I create a column?
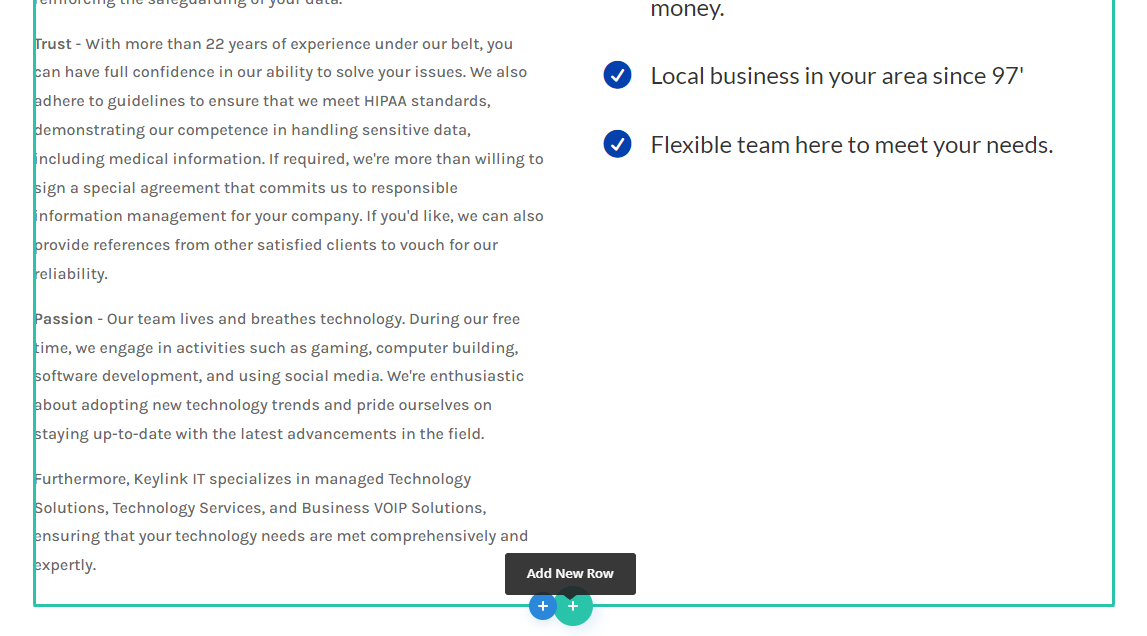
1. To create a column, click on the green plus button on the page you are editing. Typically, you will find the green plus button below other columns or at the top of the page if the page is blank. See screenshot to have a visual for the green plus button.
How do I edit columns & elements?
How do I edit a column I have added to my page?
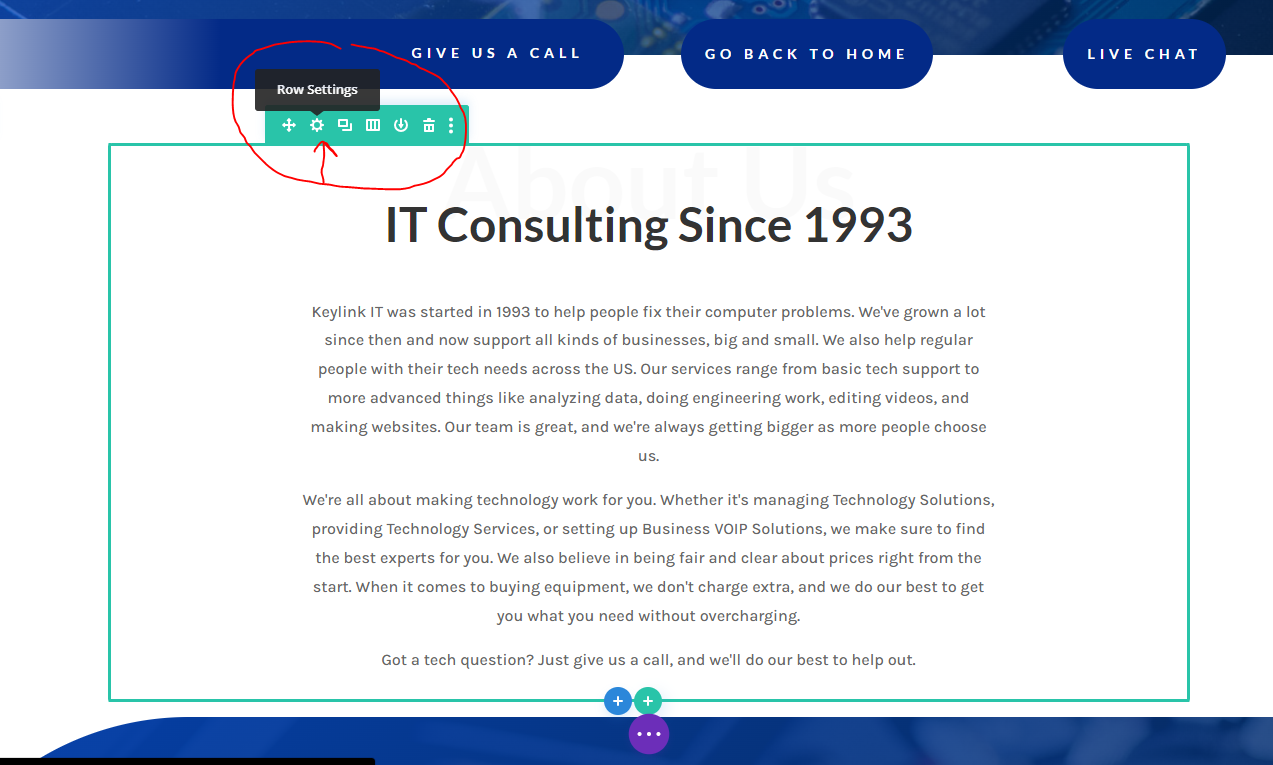
1. To edit a pre-existing column, simply hover your mouse over a section that has a column within it. Next, click the green cog that appears.
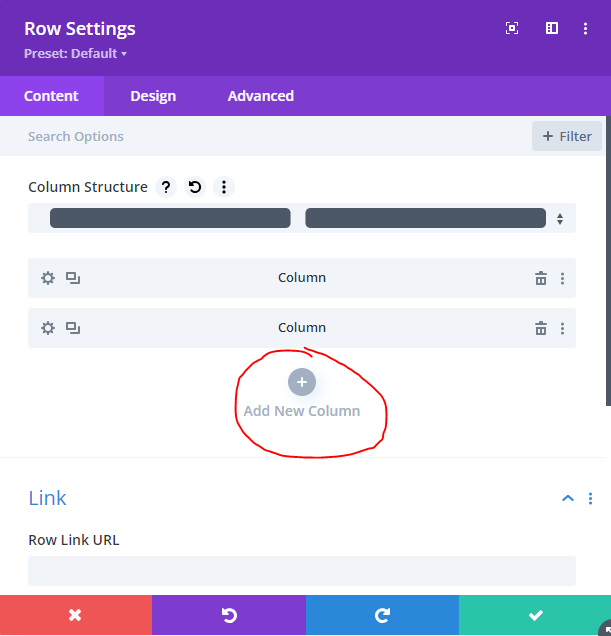
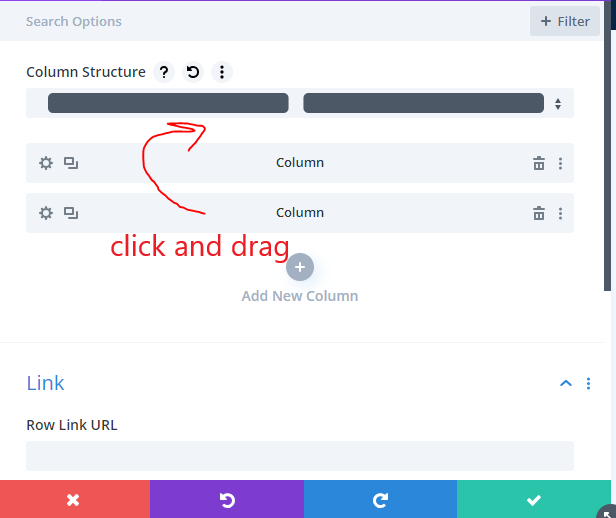
2. Next, you will see the columns in this column. If you would like to increase the number of columns, click the “Add New Column” button.
3. If you would like to re-order the columns, click and hold on a column and drag it to the new location.
How do I edit a elements I have added to my page?
Editing elements can be a little more complicated as the exact settings for each element is mostly unique. To keep things simple, we will just go over how to access these settings. If you have any specific questions regarding an element, email [email protected].
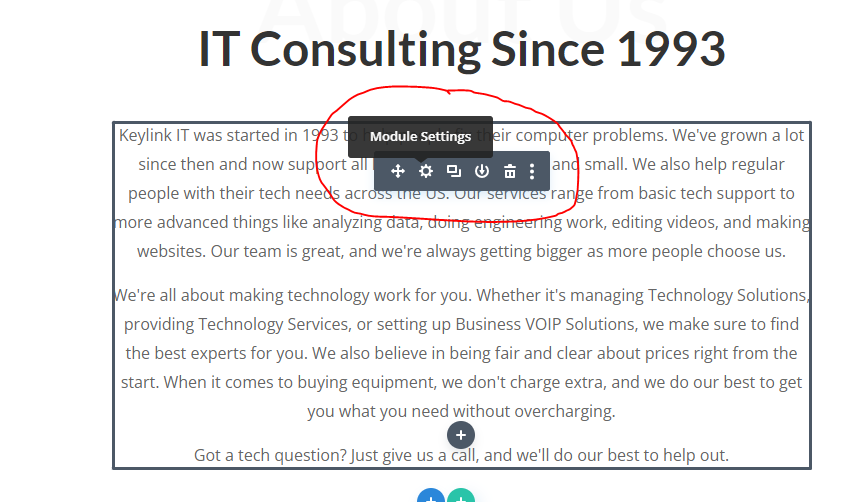
1. To edit a pre-existing element, simply hover your mouse over a column that has an element within it. Next, click the gray cog that appears. Based on your element, you will see different settings here.
How do I undo, save or revert changes to a page?
How do I undo a mistake I have made?
Editing pages is not an easy task so its normal to make mistakes while doing so. If you have made a mistake, please follow the directions below:
1. To quickly undo changes you have made to a page, you can use the keyboard shortcut CTRL + Z to undo your last changes. Be careful, you will undo more than your previous change if you press these keys multiple times.
OR
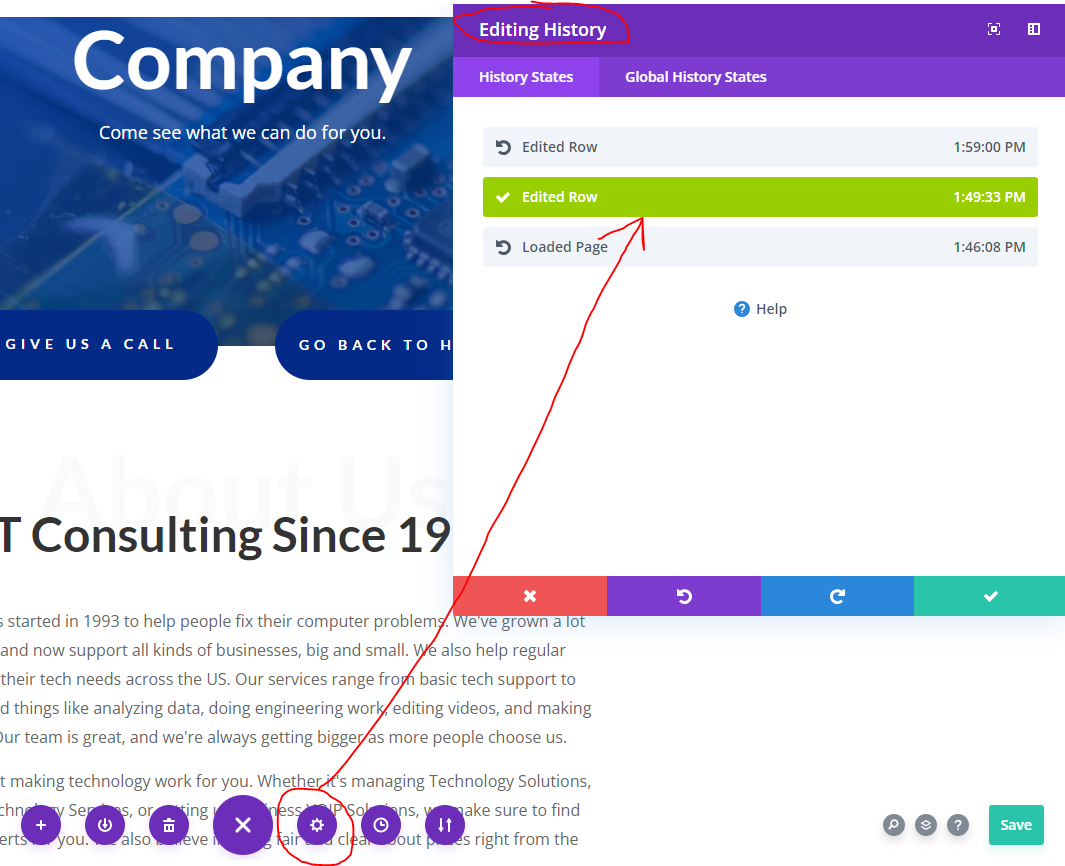
1. Click the three dots in the purple circle at the bottom of the page.
2. Next, Click the clock icon in the smaller purple cirlce that appears
after step 1.
3. You should now see a list of past changes you have made. To revert to a past change, simply click the past change and it will turn green. All changes after the selected change will be reverted.

How do I make design customizations to elements?
How do I customize an element ive added to a page?
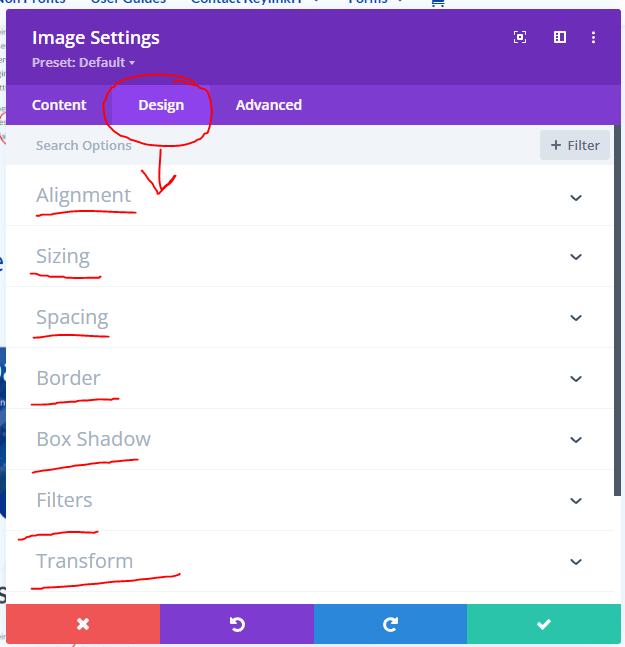
When creating a page, you will be adding elements to your page that do not exactly meet your expectations. To resolve this, you will need to edit the element’s design tab. This section will teach you how to edit your element’s design.
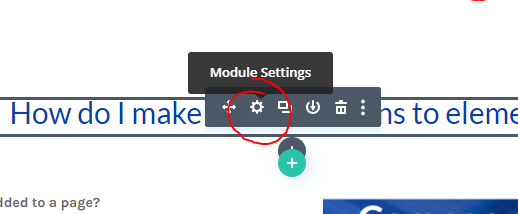
1. First, click the settings cog on an element that appears when hovering your mouse over it. This settings cog will be gray as elements will appear with a gray border.
2. Navigate to the “Design” tab at the top of the screen.
3. Once you are in the design tab, you can customize your elements without having to edit any code! Just keep in mind, each element has different design settings.
How do I hide columns or elements on mobile, desktop or tablets?
How do I edit the visibility of columns or elements?
When creating a page, sometimes you will be creating a page that requires elements that may only work on either desktop or mobile. If you need to hide a column or element, follow the directions below.
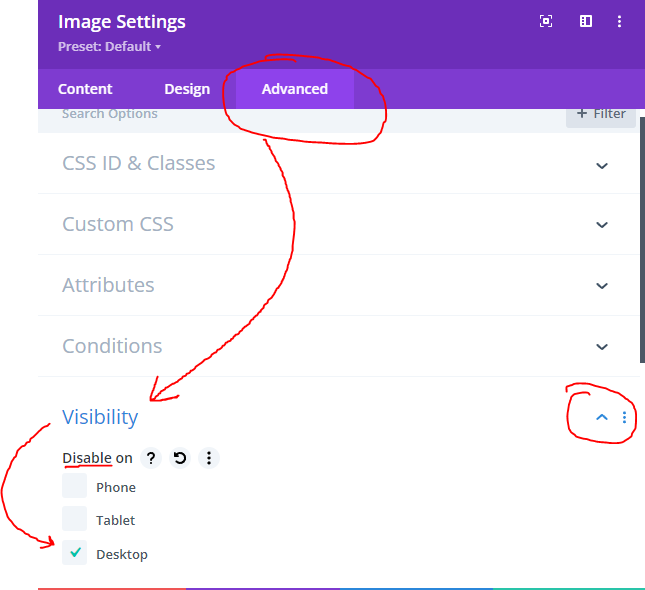
1. First, click the settings cog on an element or column that appears when hovering your mouse over it.
2. Navigate to the “Advanced” tab at the top of the screen.
3. Once you are in the “Advanced tab”, click the “Visibility” section on the page below.
4. You will now see 3 checkboxes for disabling the visibility of the currently selected column or element. If you would like to hide only on desktop, click the desktop checkbox.
Keep in mind, the element will now display as partially transparent on the front end editor. You can still edit it but if you loaded the page outside of the front end editor, the element would not display.

How do I import a template for my page?
How do I import a pre-build template for my divi page?
When creating a divi page, you do not always need to start from scratch. With the Divi page builder, you can also import pre-built page templates you think will fit your website. These pre-built page templates are fully customizable!
1. First, create a new page or edit a blank pre-existing page.
2. Open the front-end divi page builder. (see previous sections for help)
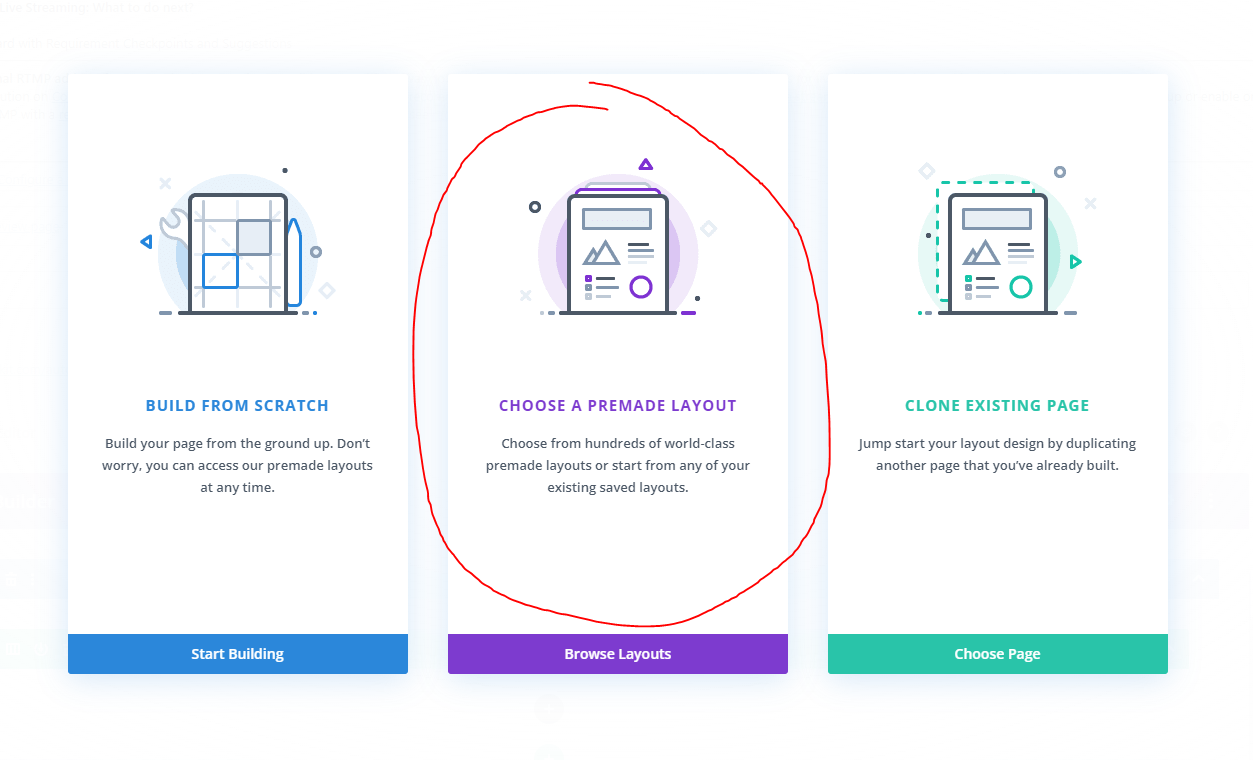
3a. [If you started with a new page] Once you are in the front-end divi page builder, you will get a popup that asks you if you would like to use a blank page, premade page or clone a existing page. Click “Choose a pre-made layout”
3b. [If you started with a pre-existing page] Once you are in the front-end divi page builder, you will need to click the three dots icon at the bottom of the page. Next, click the “+” plus button on the left of the menu that appears.

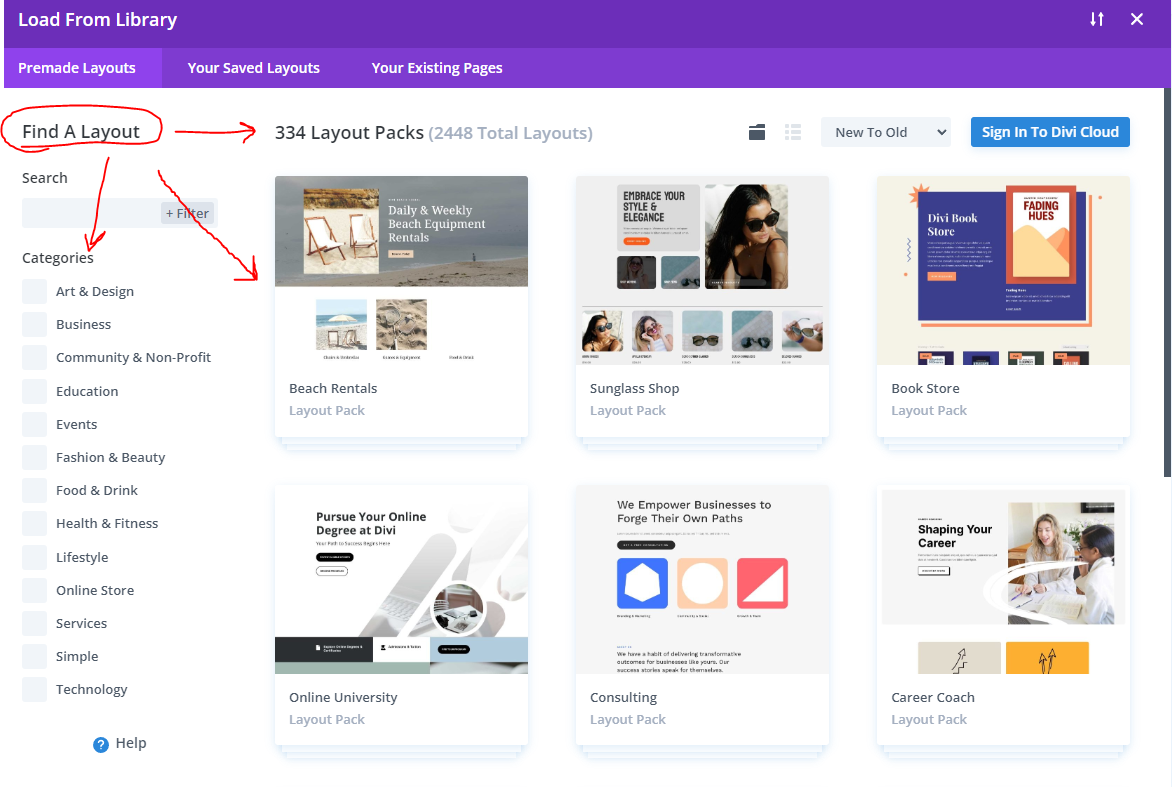
4. You should now see a library of pre-built divi page templates to select from. Find something that you think could look good on your website. Keep in mind, they are fully customizable so the initial template does not need to be related to your website. For example, you can import a shoe store website template and edit it to look like a flower store point of sale website.
Once you find a template you like, import it and you are done!
How do I save a column or element for future use?
How do I save a column or element so I can use it again in the future?
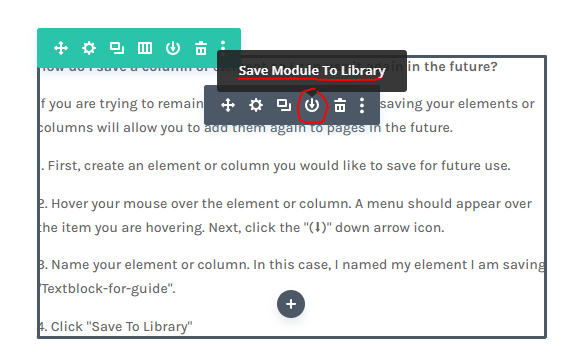
If you are trying to remain consistant and save time, saving your elements or columns will allow you to add them again to pages in the future.
1. First, create an element or column you would like to save for future use.
2. Hover your mouse over the element or column. A menu should appear over the item you are hovering. Next, click the “(⬇)” down arrow icon.
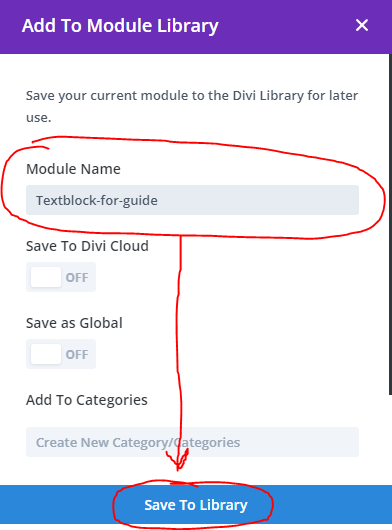
3. Name your element or column. In this case, I named my element I am saving “Textblock-for-guide”.
4. Click “Save To Library”
How do I load a saved column or element?
How do I load a saved column or element to my divi page?
So you saved you element and now you need to use it? Well luckily for you, it is quite easy!
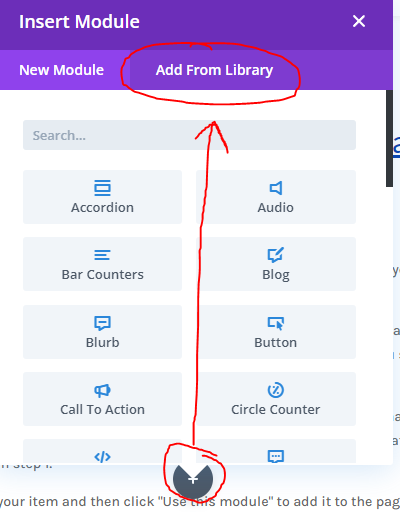
1. Click the “(➕)” plus button to add a new element or column to the page. Remember, if you saved an element, the plus button will be gray. If you saved a column, the plus button will be green.
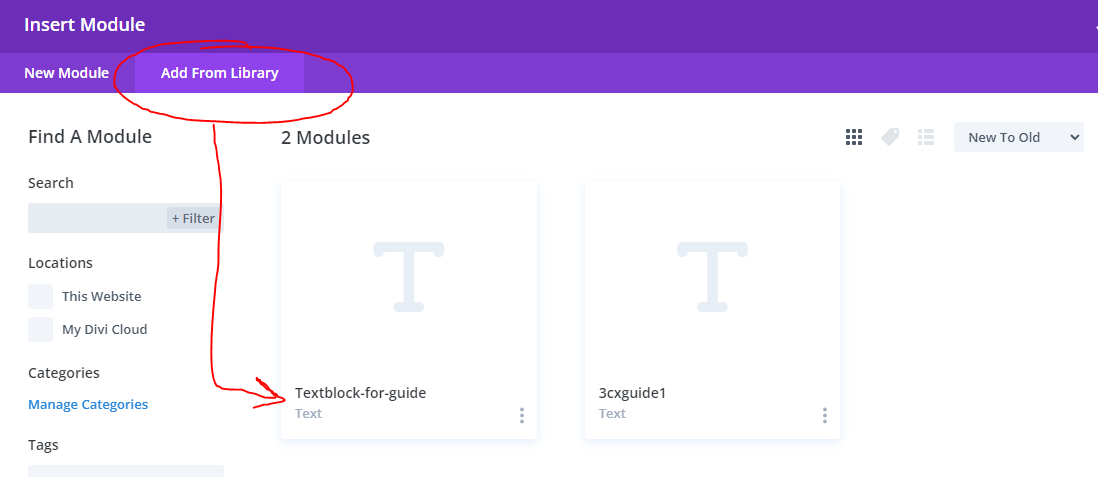
2. Select the “Add from Library” tab at the top of the popup. This will change the popup to a library of saved elements or columns depending on what you selected in step 1.
3. Select your item and then click “Use this module” to add it to the page.
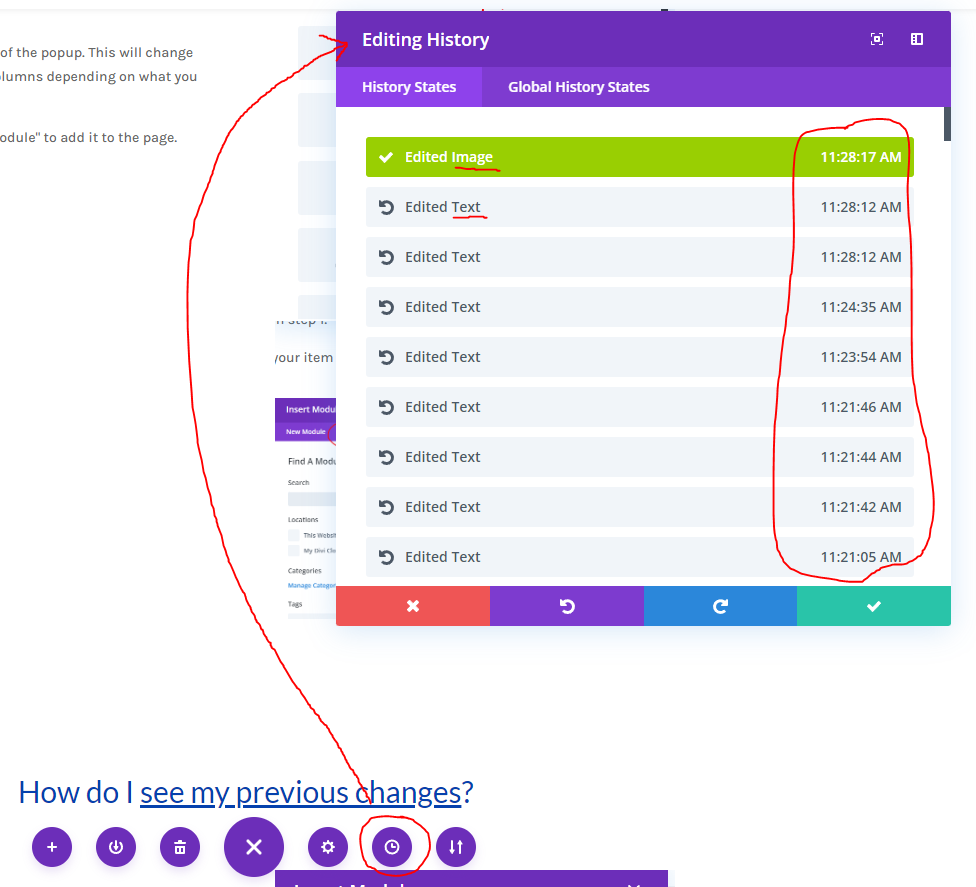
How do I see my previous changes?
How do I see my previous changes?
Sometimes, you make mistakes so far back that you cannot fix them by using the undo button. This section will show you how to see the history of edits you have made and revert to past edits.
1. Click the “(…)” three dots button at the bottom of the page to open the divi menu.
2. Click the “(🕒)” clock button that appears. This will cause a popup to appear with your past edits.
3. Click on any of the edit entires that are listed on the page. Be careful to not go too far back as there are timestamps listed with each edit.
If you need to revert to a even older version (Days or weeks old) see the following guide: Revisions for beginners (External website)
